Wednesday, June 3, 2009

"Field Guide to Cookies" Cookbook Giveaway

A cookbook full of great cookie recipes! I'd love to win this one!

Go to Brown Eyed Baker to post a comment and enter to win too!

(Contest ends June 6, 2009 at 11:00 pm!)

Monday, May 25, 2009

Happy Memorial Day!

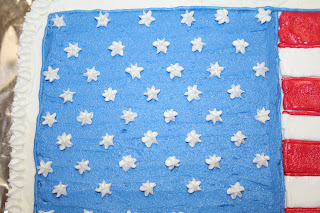
I was making a cake for a Memorial Day Picnic that I was going to today and in coming up with an idea... of course I thought of... An American Flag Cake!

The cake is an 11 x 15 cake, 1/2 yellow and 1/2 devils food. Baked in the same pan at the same time... Super easy using these instructions and pictures found on Into The Oven (If you want to view the pictures, you'll probably need to create a log-in...)

Anyway, I once again frosted the cake with Bakerella's Easy Buttercream (see my previous post for a link). I used Royal Blue and a smidge of Black to get the blue color and for the red, I used a combination of Red Red, No Taste Red and Christmas Red (pretty equal amounts of the three).

I used the following tips: lines between the stripes and around the cake - tip #3, stripes and blue field - tip #47 (then I smoothed it with a spatula), stars for flag - tip #16, top border - tip #17, and bottom border - tip #21

First I frosted the cake in white buttercream. Next, I put the cake in the fridge to set up a little while I figured out the dimensions for everything. (I used tip #47 since it was approximately 3/8. I used two swipes of tip #47 to make each strip, approx 6/8. The thirteen stripes ending up being 78/8 (6/8 x 13). The entire cake was 88/8 (8/8 x 11). So there was 10/8 leftover (88/8 - 78/8). I left half (5/8) of the leftover 10/8 on the top and half (5/8) on the bottom. Next, I had to figure out how big to make the blue square. On the real flag, the blue square is as long as the top 7 stripes on the flag... so I measured the top 7 stripes... 5 1/2 inches. So the blue needed to be a 5 1/2 inch square. (Hope that made sense!)

Once I figured out all the dimensions, I took the cake back out of the fridge and marked my lines on the cake. I measured using a ruler and then used the ruler on edge to put marks on the cake. First the outside square... then the bottom stripes... then the square for the blue... then the top stripes. Finally I was ready to decorate!


First, I outlined the inside of the square with blue (only the two sides that touch the stripes...) and then filled in the blue square. Next, I outlined with red for the strips (once again only the inside lines... not the very outside....) Then I piped the red stripes and smoothed them... then the white stripes... then I piped around the entire flage with blue to give it a nice outline. Finally, I put on the stars, first on the blue field (just like the real flag, 50 stars, nine rows, alternating 6 and 5 stars in each row!), then the top star border and finally the bottom star border. I'm pretty proud with how the cake turned out! And it was pretty yummy too!


Sunday, March 1, 2009

Grandma's Birthday Cake!

For my Grandma's 89th Birthday, I made her a stacked "Pansy" cake. My Grandma has always loved Pansies and I of course learned how to make them in my Wilton classes...


The top layer was a chocolate cake and the bottom was yellow. Both cakes were filled w/ a chocolate whipped cream filling (1 3/4 cup heavy cream or whipping cream, 5 T powdered sugar, 3 T unsweetened cocoa.... just whip it up! really tasty!)


I frosted the cakes with Bakerella's Easy Buttercream.

I also made some chocolate cupcakes with the leftover cake batter... and frosted/decorated them with the buttercream and some leftover Apple Blossoms and Violets.

I used Juniper Green with tip #352 for the leaves... I used shell borders (a smaller one on the 6 inch cake and a larger one on the 8" cake...) And no, I can't write that well! I used one of Wilton's message press sets! :-)

Friday, December 5, 2008

Little Einsteins Rocket Cake

For my daughter's 2nd birthday, I decided to go with a Little Einsteins theme... and that meant a "Rocket" cake!

I started by baking a 11x15 sheet cake using a yellow cake mix and a football (I used Wilton's football cake pan) shaped cake pan using a chocolate cake mix... then I carved them to the shapes I needed... the football was for the top of Rocket and the sheet cake for the bottom...

I frosted the entire cake with buttercream frosting... I used the Easy Buttercream Frosting recipe from Bakerella's blog... thanks Bakerella it's delicious!

I had to use tons of Red and No Taste Red Icing Colors to get the red (oh, and a little bit of orange...) and I used Royal Blue and Lemon Yellow for the window and accents...

The rocket thrusters are made out of twinkies w/ graham crackers cut to make the fins...

Let see... what else... I covered a 13x19 cake board with two layers of a blue transparent wrapping paper that I bought at a dollar store and I made the antenna on top from a cherry dum-dum... I colored the lollipop stick with a red edible marker... oh, and the Einsteins in the window are actually a sticker from a sticker book - I put the sticker on waxed paper and then "glued" it onto the window with buttercream frosting...

This cake was a TON of work... but I think it was worth it in the end!

Can't wait to see everyone's reaction tomorrow at the party!

Wednesday, November 26, 2008

Key Lime Pie

Cake, Cake and More Pie? Ok... so it's not another cake... but what can be better than Key Lime Pie? Not a whole lot if you have ever had a good one!

I use my mom's recipe and it's delicious! So yummy in fact that Key Lime Pie is my designated item to bring tomorrow for Thanksgiving at my cousin's house! It's also really easy to make... (btw... the sour cream topping also makes a pretty good fruit dip!)

SOUR CREAM TOPPED KEY LIME PIE

Crust
(for one 9-inch pie)
- 1 pkg. graham crackers (Nabisco Honey Maid)
- ¼ cup butter
- 1/3 cup sugar

- Crush graham crackers (roll w/ wooden rolling pin in gallon size plastic bag)
- Melt butter.
- Pour crushed crackers into bowl and stir in butter and sugar until coated.
- Set aside small amount (approx 1 Tbsp.) to sprinkle over sour cream topping.
- Press into pie pan (use metal spoon to press down and shape).
- Bake in 350° oven 5 minutes.

Pie

- 2 eggs
- 1 can (14 oz) sweetened condensed milk (Eagle Brand)
- ½ cup key lime juice (you can use fresh if it's available... and you don't mind juicing all the key limes!...)
- 1 tsp. grated lime rind (optional) (I never put this in...)
- ¼ tsp. salt
- 1 baked 9-inch graham cracker pie shell

- Beat eggs slightly.
- Add milk, key lime juice, 1 tsp. lime rind and ¼ tsp. salt.
- Beat at medium speed 2 minutes.
- Pour into shell.
- Bake in 350° oven 10 minutes.
- Let cool on counter-top while preparing sour cream topping.


Sour Cream Topping
- ½ pint (1 cup) sour cream
- 1/3 cup sugar
- 1/8 tsp. salt

- Mix sour cream, sugar, and 1/8 tsp. salt.
- Spread over top of warmed pie.
- Sprinkle remaining crumbs evenly on pie.
- Return pie to oven for 5 minutes at 425° to set sour cream.

NOTES:

Crust – double recipe for two 10-inch pies.
Pie – triple filling recipe for two 10-inch pies.


BTW... if anyone is looking for an awesome pie carrier... here it is! The Dual Chef's Tote by Lamarle - you can carry 4 pies w/ this! (It's basically two of the single Chef's Totes... but it includes a longer handle to carry them together...)

Thursday, October 23, 2008

Chocolate Cherry Cake

So it's been a while since I've posted... We've been really busy (I had my second baby two weeks ago!) and since I'm done with my classes I haven't been baking too much. I found this recipe for Chocolate Cherry Cake online and it was so easy and tasty that I had to share it! If you like Chocolate Covered Cherries - then I highly recommend it!

Here's a couple of pictures... (I had to bake mine for closer to 40 minutes... so make sure to watch your oven...)

The cake right out of the oven...


The frosted cake...

Friday, October 3, 2008

Fondant Tool/Book, Cupcake Kit or Phone Call Giveaway!

Want to win a Celebrate w/ Fondant book and fondant cutter? How about a Cupcake starter kit and Silicone Cupcake Silly Feet? Or maybe you have some questions you'd like answered and want to talk to an expert?

Enter to win this contest at The Sugar Lane you could be one of FOUR winners! (All you have to do to enter is post a comment! How easy!)

Thanks again Donna for hosting another great giveaway!

(Contest ends October 7, 2008)