Showing posts with label Royal Icing. Show all posts

Tuesday, August 5, 2008

Wilton Cake Course III, Class 3

Last night was my third class of Wilton 3 and WOW! did we learn a lot in a very short amount of time! I REALLY need to practice this week!

We started class a little late and only had time to do a couple of each flower in class... also, we had to go over the fondant rose since we didn't go over last week... (there are only two of us in the class and my classmate wasn't there last week... so the instructor wanted to wait until she was here this week to go over the fondant rose...)

So anyway - first we learned the Easter Lily - it wasn't too hard... but I made my icing a little thin and the petals wouldn't stand up right...


Second we learned the Poinsettia - I think this was the easiest flower of the evening...


Next we learned the Petunia (yellow)... not so easy... I really need to practice these! And finally, the Morning Glory (blue)... even harder than the Petunia! I need TONS of practice on these! My instructors looked a ton nicer than mine... she only made one of each and my classmate took those home, so I'm going to have to rely on the book as a guide for practicing.


Here is a picture of the Easter Lily and Poinsettia my instructor made... She made two of each of these... so we could each take one home....


The last thing we went over was the fondant rose. We flew through this! (Excuse my blue rose... I used leftover blue fondant I had from my bow from last week...) These weren't too hard... but we went through it so fast I missed doing a couple of steps so it doesn't look quite right... but I'm pretty confident I can make them fairly easily by myself when I'm not rushing so much...


So next week in class we make our tiered or stacked cake. I'm planning on doing a stacked cake... I just have to decide on the design. I do know that I don't want to make the "wedding" tiered cake in the book... I won't have time to make all those fondant roses this week...

Tuesday, July 8, 2008

Wilton Cake Course II, Class 4

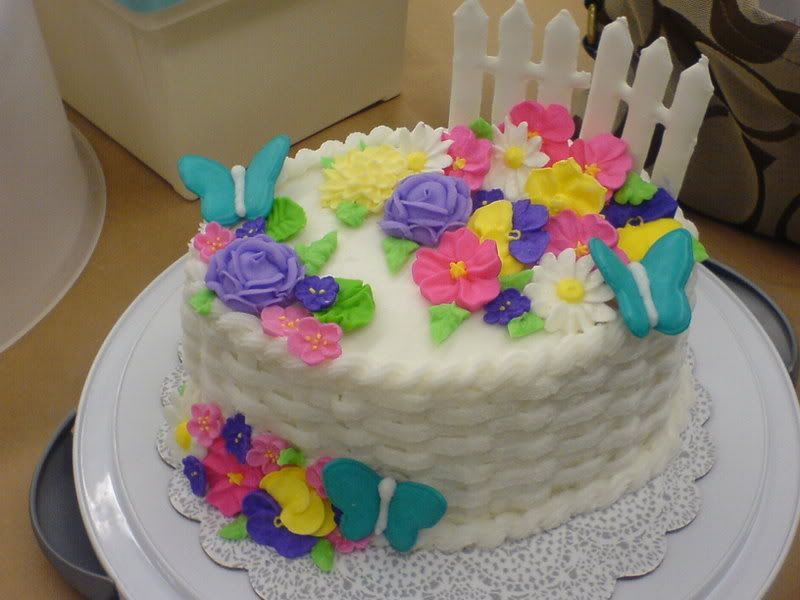
I finished Wilton II! Yeah! I am the most excited about this cake! I really think it turned out well! And I'm glad it did... there was tons of work involved in this cake!

Last night we learned to do basketweave and the rope border.... both were pretty easy, but the basketweave is VERY time consuming! The rest of the class time was spent decorating our cakes. I made a Duncan Hines Marble cake and used Chocolate Buttercream frosting as the filling and to frost it with. (I really like the way the color of the flowers stands out against the chocolate!)

I only did the rope border along the top instead of both the top and bottom like the book shows. My instructor thought the bottom looked so nice she said she'd leave it off... and I'm glad I did... the bottom of my basketweave was really even!

You can get a feel for the cake in the pictures... but I'm not sure the pictures do it justice! (btw... it tastes really yummy!) I decided to leave off the color flow birds and/or butterflies I made. I liked it the way it was!


Last week I signed up for Wilton III which starts next Monday. Classes in July are 50% off at Michaels so I paid $17.50. Then last night my instructor gave us a $10 off coupon! Fortunately, the great girls at Michaels were able to return the class I purchased last week and re-ring it w/ the coupon - so I only paid $7.50 for the class! Plus I bought the course 3 student kit last week w/ a 50% off coupon too! (Also, I think they give you a free gift in the class as well...) I can't wait to start the next class... we learn more flowers... some fondant techniques and how to make tiered cakes!

Tuesday, July 1, 2008

Wilton Cake Course II, Class 3

More Royal Icing flowers! Pansies and Daisies, Primroses and Daffodil's! None of these were too difficult... but I'd have to say the pansies are my favorite!

I only made 5 or 6 of each flower in class..... but I can't stand to waste all that icing (btw - the class book says to make 2 recipes of royal icing... but in an effort to minimize my leftovers, I only made 1 1/2 recipes... and I still had a TON leftover!)... so last night I came home and made about 30 more pansies... and this morning I've made 24 daisies... 18 daffodils... and 24 primroses....

I did the same thing last week w/ the violets, violet leaves and apple blossoms... so I know I'm going to have royal icing flowers that last for the rest of my natural life! I could NEVER fit all these flowers on one cake (unless it was a gigantic sheet cake!) But I figure... I'll keep them and whenever I make a cake or cupcakes I can save myself of ton of time by using these leftover royal icing flowers to decorate with! (Wilton says that royal icing can be kept for 2 weeks, but I don't see how... I had some leftover after the last class that I tried to use about 4 days later and the flowers and leaves just seemed to "melt" onto themselves... so I can't imagine how it would last for two weeks. I asked my instructor about it and she said that she finds she also has better luck w/ the royal icing if she uses it soon after it's made.)

Here are a few of my flowers...

Tuesday, June 24, 2008

Wilton Cake Course II, Class 2

Last night we learned how to make some new flowers w/ royal icing and also how to use color flow icing. I'm having tons of fun in this class and I really love the things we just learned! It amazes me what you can make out of icing! I also love the fact that these flowers can be made ahead of time! (It's been very rewarding and exciting to see how much I've learned and how quickly. Not too mention that fact that each time I learn something new, I don't feel quite as bad about all the supplies I've bought and want to buy! :-) I think my husband also feels that way! :-) I think he's been pretty impressed w/ what I've learned to do in such a short time!)

The first thing we did last night was work w/ color flow icing... I'm not completely thrilled w/ the birds, although I do think they came out better than I was expecting... I had ready a butterfly pattern also... I've seen pictures online of cakes w/ the birds and also w/ the butterflies and I think butterflies look way cuter! :-) I was so nervous about working w/ color flow since the book (and our instructor) warned us to be careful since it can dry out quickly. I'm relieved to say I didn't have any problems w/ this! We outlined our designs w/ a tip #2 and then used a parchment bag w/ a tiny tip cut off to fill them! I also have TONS of leftover color flow icing... maybe I'll make a few backups in case some break...

My best bird (I need to buy the edible markers to make the eye and color the beak...)


My butterflies...


Next we moved on to royal icing... we brought 4 colors to class - yellow, green, pink and purple... and made apple blossoms, violet leaves, and violets... I was able to make 7 or 8 of each in class and then I made some more at home last night (At the suggestion of my instructor, I dried some of my leaves on the opposite side of the flower former to have them curved in different ways..._ I still don't know what flowers I want to include on my final cake... So I'm trying to make sure I have extras of everything. (After all, they'll keep for a while - I can make cupcakes or a small cake w/ my leftovers!)

Flowers/leaves I made in class...


Closeup of flowers/leaves I made in class...


Flowers/leaves I made at home....


Next week we make more royal icing flowers! (victorian roses, daisies, daffodils, pansies, and primroses...)

Tuesday, June 17, 2008

Wilton Cake Course II, Class 1

Last night was my first class of Wilton 2 "Flowers and Borders".

We reviewed some basics of course 1 (how to make a parchment bag, the shell etc.). Then we moved on to learning a couple of new buttercream decorations - the Reverse Shell, the Rosette and the Rosebud (none of which were too difficult once the instructor showed them to us).

Next our instructor showed us how to make Royal Icing (the best way I've heard Royal Icing described is that it takes like "dots" candy - you know the candy dots that are on paper - it really does!). She gave us some and we learned to make Chrysanthemums! She let us take the leftover home (which was quite a bit... since there are only two of us in the class...). I was glad that she did - I made 5 mums in class and they didn't come out too good... I made tons more at home last night and I was getting better. I still have some icing left and as long as it didn't dry out, I'm hoping to make some more this morning to practice (hopefully I'll get better, they don't look too bad, but they don't look like the ones in the book...).


Part of our homework was to cut out all the flower nail templates in the back of the book (there is a template for all the different flowers we're going to work on). Our instructor let us use hers in class and gave us a great idea - she cuts hers out and puts clear tape or laminating paper on top, then she puts a magnet on the back so the flower template will stay on the flower nail! Then all you do is rub a little shortening on the top of the flower template and lay your waxed paper on it and it sticks! It really works nicely!

Can't wait for next week! - color flow... and more royal icing flowers (apple blossom, violet leaf, and violet)